Monday, June 28, 2010

Dyeing with Freinds

My friend Ellen came by to spend an afternoon dyeing with me. (Doesn't that just sound....strange...getting together to die/dye.) But we did! It was Ellen's first dyeing experience, and it was fun to have her here.

This pink boucle yarn was our test piece. We were unsure of the fiber content and wanted to see how well the different parts of the yarn would take the dye. Both the thick/thin and the binder yarns took dye beautifully!


Here's my handpainted skein. It's a wool/silk blend that started off as white. I'm not sure how I will use it, but I like the colors (dusty rose & olive drab).


And here's a shot of the dye pot after we had pulled out Ellen's skeins. Mums the word on the color that we chose to dye...but the yarns looked gorgeous coming out of the dye pot!

These were acid dyes on wool/silk and wool/?? and mohair.

:) I love dyeing!

Saturday, June 26, 2010

BitterSweet--Nilus sold

I should be jumping up and down...my 4 shaft Nilus Leclerc loom has sold! I must admit that I really liked that loom and I will miss it. If I had been using it more (it hasn't been warped in months!!) I would not have considered selling it.

It sounds like the loom will be going to a good home. It will again be a "first loom".... May you have many happy weaving days, Jeane!

The sweet part of this sale, was warping the loom one last time. I had an extra warp (would you believe I wound twice as much as needed for a project?) and threaded it in an advancing twill.


Wow!! Advancing twills are beautiful! I can't wait to do more!!


My upstairs workspace is much smaller now...

Tuesday, June 08, 2010

Acid Dyes on Wool

Oh, I'm a happy camper! I have two stacks of beautiful rovings! This was my first opportunity to dye after taking a class with Rita Petteys (see my previous post on the class).

These are wool rovings-one coopworth and one Romney. The dyes are acid dyes from Pro Chemical.

The rovings were soaked in warm water and vinegar for 30 minutes, then the water was spun out (hooray for my salad spinner!) and the wool was laid on plastic wrap on my table.

The dyes were all in squirt bottles and I squirted them in bands across the wool.

After putting a top layer of plastic wrap on the wool, I used my hands to smoosh (technical term!) the dye into the wool.

The wool/plastic sandwiches were rolled into bundles and steamed for 30 minutes.

:)

I think they are super pretty!!

Thursday, May 27, 2010

Handspun Wool Singles as Warp

More headway on overcoming my "fear" of handpspun in weaving. I'm beginning to think that it's not so much a fear or quirk as it is a lack of data. I'm not confident how it will behave, so I hesitate to use it.

This continuation of my quest uses a handdyed, handspun wool single as the warp. It was a small skein, but I was able to get 121 ends out of it for a two yard warp.

I know two yards is almost nothing for a warp, but this is a sample...it's just a test. And, it turns out, it was a good test.


One warp thread broke early in the weaving (oh, details: 8h, straight twill threading, woven as plain weave throughout). Later on, two or three threads started to pull apart and I could feel that the piece wasn't stable anymore.

So, I got a one yard sample woven. My weft yarns obscured the warp colors. It's so sad :(
That will be the focus of yet another set of samples! I want to learn to get warp stripes in my weaving!!

I didn't use any sizing on this warp. I have sized wool singles before, and I would rather not mess with soaking the yarns in the sizing solution, letting them dry, picking them apart, etc. While I was reading one of Paula Simmons' books ( "Spinning and weaving with Wool" or "Spinning for Softness and Speed") I noticed the comment that while Paula preferred to spin and weave with singles (using a sizing on her singles warps), her husband liked his two-ply warp yarns...and so he spun his own warps!

I may be spinning two-ply warps!

:)

Oh! The photo at the top of the post needs a word of explanation! I usually warp front to back, but I was concern about the integrity of this single yarn as a warp and didn't want to expose it to any unnecessary stress, so I rigged a raddle (the thing with twisty ties on it!) and tried warping back to front. It was easier on my back and shoulders to warp the Baby Wolf this way. It may be time to make a "real" raddle.

Saturday, May 22, 2010

Sticky Baby Wolf Shaft


The first shaft on my new-to-me 8H Baby Wolf was sticking. I tried spraying silicone in the tracks as Schacht suggested, and it didn't solve the problem.

A friend has an older Baby Wolf about the same age as mine, and her husband suggested I check the pins in the mechanisms that lift the shafts as they are pressure fit and can loosen over time.

Go figure...one of the pins on the shaft that was sticking was out. It took a pair of pliers to push it back in, but it worked! No more sticky shaft!

--The pin is likely to work loose again. Packing tape was suggested as a way to keep the pins from pushing out.

(Thanks, Ron!! )

Handspun, Handwoven

Here at my house we are each allowed a handful of fetishes or quirks. I'm working on a series of projects to try and overcome one of my fears/fetishes.

I spin yarn. I want to weave with yarn that I spin. I_am_afraid of working with my handspun yarn.

Why am I afraid of it? What do I think will happen with it or to it? I don't know. That's why it falls in the fetish/quirk category.

But, I am a brave girl! I can overcome my fears of using my handspun yarn.

I've put together a couple of different bits of handspun yarn with the intention of making samples. Really, just samples. These projects serve no purpose, except the one to help me overcome my fears!


This warp is a two-ply yarn, probably a Romney wool, handdyed with dandelions. I sett it at 12 ends per inch, threaded in a straight twill, and wove a pattern from Strickler's Patterns for 8 harness weaving. The weft is a handdyed, handspun single.


When the handspun single weft ran out, I shifted to some other handspun yarns and plain weave. The red is a dyed two ply, probably cotswold wool, and the brown is a natural brown wool single.


Would you like to know what happened when I wove with my handspun yarns? Did they explode? Pull apart? Make strange lumpy, bumpy fabric? Nope. The yarns behaved like....well, like yarns!

Go figure! Maybe there is hope for this fetish of mine!

Thursday, May 20, 2010

Ruffler!

This is a ruffler. It happens to be an old Singer ruffler being used on an older Elna sewing machine, but it works wonderfully!

My local sewing/fabric store, Caldwells, is amazing. I walked into the store asking for a $10 presser foot to do gathers. The sales clerk went directly to a $40 presser foot contraption (that almost gave me a heart attack!), only to discover that it was the wrong connection for my machine. (Whew!)

Then she went looking in their used pieces, brought out a ruffler like this and told me how they work.--She also commented that she had the $10 type of presser foot I was asking about and it didn't really work!

It took a bit of searching for the clerk to find the right size ruffler for my machine, but she did. $5 later, I was the happy owner of a ruffler foot!

And look what it does--in one evening, too! This is intended to be a skirt for my oldest daughter. I need her to try it on before I do any more finishing to it.

The ruffler is a wonderful attachement. It creates evenly spaced mini pleats and sews them to another fabric all in one pass. No more basting stitches to pull!

:)

Friday, May 14, 2010

Gifts

The other moms in our home schooled preschool group have been kind enough to watch my daughter before school on the days that my weaving guild meets.

One of the moms has started using cloth napkins, so a few weeks ago I made a set for her. This morning I finished the gifts for the other two moms: a pleated scarf and a table runner.

Believe it or not, the last two items were woven on the same warp! The warp is an unknown fiber yarn (it feels like it could be a polyester) that is a nice shade of blue with flecks of tan and white in it. The weft for the table runner is a fingering weight acrylic knitting yarn. The weft for the scarf is white, 20/2 tencel. The hand of the two items is very different!!


The weave structure is an eight harness summer and winter pattern from Strickler's Weaver's Book of 8-Shaft Patterns. The scarf was woven as plain weave with gathering threads placed using two of the summer/winter patterns. The gathering threads (polyester sewing thread) were pulled tight and the pleats were steam set for 20 minutes. The table runner is pattern #554 and looks different on the front and the back.

Sunday, May 09, 2010

Dye Class with Rita Petteys

Linda Adamson of Tabby Tree Weaver in Arcadia hosted a beginning dye class with Rita Petteys of "Yarn Hollow" . The class was fun! Rita covered immersion dyeing and handpainting of protein yarn and fibers with washfast acid dyes.

The best part about the class (aside from some of the cool tips and tricks Rita taught us) was getting to play with color! There was a box with perhaps 100 dye powders (don't trust my numbers here...I didn't really count, it just seemed like tons of color to a girl who owns three (count them, three) jars of dye!) and the same number of quart jars of dye solutions--all ready to be used!

We were given some instruction on making dye solutions, given the opportunity to practice, and then set loose. If we finished a dye solution we were to refill the jar, but we could use any and all colors we desired.

Wow!

My pictures are of three of the five projects I did. The first was a solid red, immersion dye on DK weight yarn. The second was a handpainted lace weight skein....and I left it in the shop! Dooh! (Linda has kindly offered to bring it to our next guild meeting so I can bring it home! :)

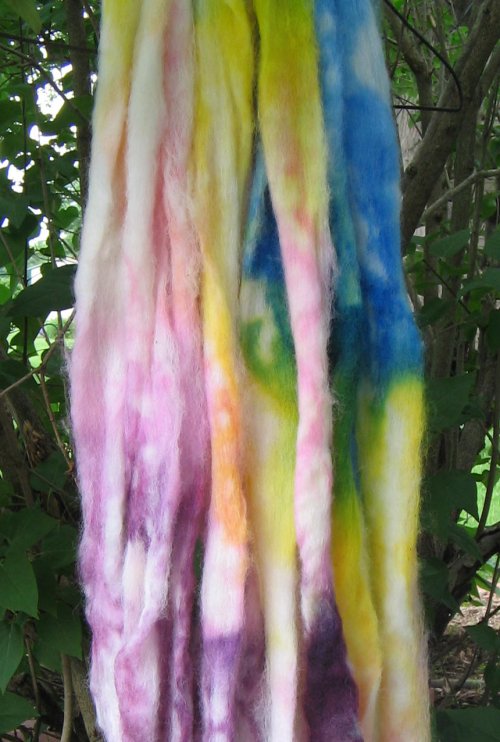
At the top is a falkland wool roving that I dyed with yellow, blue and a darker blue/black.


Next is some of my Romney roving that I squirted with orange, then added an olive green and a diluted leaf green.


And lastly, here is a sample knit piece that I dyed and will unravel and re-knit.

Rita has a nice post on sockblanks on her blog. I think I may need to go through this exercise myself to see how dye patterns on the blank translate into knitting.

It was a great day! Thanks to Rita, to Linda A., and to a fun bunch of classmates!

Tuesday, April 27, 2010

Spring Cleaning

I've been doing a bit of spring cleaning around the house. It started on Tuesday or Wednesday of last week with a garage sale purchase. This Domestic sewing machine came home with me (a bit unexpectedly)! I've oiled the machine and cleaned it up--but I don't have any experience at fine tuning a machine like this, so I may need to make a call to some experts to make it sew a seam.

The next bit of spring cleaning is without a photo. We moved to this house almost four years ago, and on Saturday I got the last box out of my son's closet. I'd been in it recently enough to know that it had some decorations and nic naks....but I hadn't been in it deep enough to discover our old box of loose change! We had over seventeen dollars in coins, and at least that much again in our children's old piggy banks that were there too!

And, the last bit of spring cleaning... This came home with me yesterday. It was a Craigslist purchase and had been living in a warehouse in Indianapolis. It's a Schacht 8 Harness Baby Wolf. There was a lot of dust and dirt on it and it took me most of the afternoon to get it clean, but it works just fine! Here it is with my test warp.

Friday, April 09, 2010

A "Real" Swimsuit


My now almost 10 year old was desperately in need of a new swimsuit. Her old one was made without a pattern and of odd material over a year ago. It worked ok, but it was odd!

This time, I purchased a pattern and spandex, and am thrilled with the outcome!

The pattern is Kwik Sew #2606 with a racing back. I got it and the swimsuit elastic from Sew Sassy Fabrics online. The fabric came from Spandex World (again, via their online store). Both stores had great service and good prices. I put my orders in on April 5th. The pattern arrived first, then the fabric arrived yesterday, and today the suit is finished!

How's that for fast!

Wednesday, April 07, 2010

Cutting Error (and Repair)


Nope, it's not mice eating my fine handwoven table linens....it's operator error--I cut into the fabric when I was cutting the napkins apart! Waaaaaa!


This is a set of Atwater-Bronson lace napkins in an unlabled yarn, which I think is a rayon/cotton blend. It's a fine yarn--about 20/2--and they turned out wonderfully soft and fine! They are perfect for a nice set of napkins.


And then I went and worked on sewing them and cutting them apart when I was a bit tired. The fabric is so much finer than what I usually weave, that I hardly noticed when I caught the edge the first time. The second time, I realized that something wasn't quite right, and sure enough it wasn't.

The napkins sat for a day or two. It took me a while to decide how to hem these (I've chosen a rolled hem--thank you internet bloggers who posted tutorials on this little hemming technique!) and now, with two napkins hemmed, I turned to this error.

The easiest repair was to simply make them shorter. I knew that there is some variation in the positioning of the lace that goes across the whole piece, so it would just be part of the variation and these are napkins.....They will never be right next to each other except in the laundry, so no one should notice the extra variation, right!?

I kept the little piece with my cuts in it. I think I need the reminder to focus and pay attention to the details in my work! :)

Tuesday, April 06, 2010

Two Dye Jobs


I'm playing with dyes again. I used to do a fair bit of dyeing and would sell my dyed rovings on ebay. Then I hit a bad spell where most of the things I dyed felted...either that or they just looked awful!

So, after taking a break, I'm at it again! Pictured here are two variations on the same theme dyed with acid dyes. The outer two rovings are the initial dye job, and I felt that they were too pale. The inner two rovings are a repeat with 3x the amount of dye. Definitely more color there...I'm not sure about beauty!

It's time to take a dye class!

Monday, March 22, 2010

A little bit of Inlay


Check out these little pictures! Starting from the left:

1. The original warp design with green stripes at the sides.

I tried to weave with this and discovered that the bumps in the green yarn made weaving impossible. My husband asked, "Didn't you notice that when you were warping?" To which I answered (with a sheepish grin), "Well, I noticed it was challenging to get through the heddle, but I didn't know that it would be impossible to weave! :)"

2. The mess. After having problems with green stripe #1, I tried replacing the bumpy green with a smooth green yarn. It made an awful mess. I wasn't careful as I unwound the warp and ended up having to cut of the green stripes and the extra yellow.

3. The yellow warp. Whew! The green weft was just a thick yarn that I used to get things started.

4. The finished flower. Look, Ma! A Flower! It wasn't terribly hard to do... it required a bit of focus, but otherwise it was ok! The background is all plainweave. To make the inlay patterning, throw a pick of plain weave, pickup the threads where you want the inlay color and pass the inlay yarn into this shed. Change sheds, throw a pick of plain weave, and do the next bit of inlay.

PS. Check out what is sitting by my sewing machine! It's my grey dots fabric--it's off the loom!

Tuesday, March 16, 2010

Plans for Inlay Weaving


Our community garden is in need of some flags. The entrance to the garden is off a busy road and the drive is just an access drive to a field. We would like to have some bright flags there to remind gardeners of the entrance, and to let other drivers know that there is a reason why people put their turn signals on at that point!


I have some BRIGHT yellow and pink-ish orange yarns that I thought would make a nice flag...the trick was figuring out how to make it look nice (as well as extremely visible!).

Swedish Weaving by Thelma M. Nye has instructions for a window blind (called "Sunsmoke" by Peter Condu) that caught my eye. The weaving is a tabby ground weave with the pattern/design thread laid in with the ground by hand.

Other references use cartoons or drawings to determine where to put the inlay and I've warped my rigid heddle loom to try it. I have the bright yellow as the background (warp & weft) with some green stripes and will try to inlay some tulips in the center. I'll use the bright pink-ish orange for the flower and two greens for the leaves. Wish me luck! This is new for me!

Here are some pictures of inlay work by others. Seeing their work gives me hope for my project!


This is a simple inlay done on a Weavette loom. It looks easy, right?
It was part of eLoomanator's Square Deal Weave-Along in 2008.


Here is one done with a "cartoon" to help create the inlay pattern. It's the Diaphanous Leaves scarf from Sally Orgren's WeaveZine article.


And this is the piece that sold me on trying this for my garden flags--Isn't this beautiful! It's by Lynette Glass. Here's the link to her website. Check out her gallery! She makes beautiful work!


And, last, but not least, LOOK! The knots at the end of my warp are visible! This is terribly terrific! How can I weave only 8" a day when the end is so near!!!!!!

Actually, my shoulder has been doing better and I have been getting 8-12" a day, but I am still being careful, and slow...and I just want to weave and weave and get this done, but I don't want to be in pain, so I'll take it slow.

Friday, March 12, 2010

4 Harness Loom for Sale


I can't believe I'm doing this! I just posted my "baby" for sale!

This is a 45" Nilus Leclerc 4 Harness loom with 6 treddles. It's a great loom! I'm including the loom, the bench, a warping board, and some books. The loom has a 12 dent reed (hmm. That's the short reed in the photo...I'm selling this with a full length 12 dent reed) and inserted eye heddles--roughly 300 per harness. $800 for the entire package--local pick-up only.

Why am I selling this loom? Perhaps, like Bilbo Baggins, I'm feeling like "butter spread over too much bread" and I need to thin down the amount of physical space my weaving takes (physically and psychologically). Perhaps, I just want the room and means to get a new toy.

If you are looking for a loom, this is a great loom! If you are local (or willing to spend some time here) I'd be willing to throw in some lessons for free.

Wednesday, March 10, 2010

Double Weave Bands

I've been inspired by Laverne Waddington's blog about backstrap weaving. She has some nice tutorials on the blog and a great article on WeaveZine. I wanted to try the double weave technique, but didn't want to figure out a backstrap set-up, so I wound the warp on my inkle loom. It took a few tries, but by the end I had an idea of what I was doing and was enjoying the process!


My inkle/backstrap double weave band lead to the desire for more band work. Out came my pattern book for double weave tablet woven bands by Linda Hendrickson. I started with a 48 card pattern, got lost, and decided to back up a step or two. The squiggles (they look a bit like blades of grass) are the hair from KokoPele's head. The upsidedown triangle thing in the dark green rectangle was the "something more simple" that I created on the fly. I think I'll be making a few more "simple somethings" before I try the charted patterns again. I'm still excited about this. It's taken me months and months to even try these patterns and I'm finally getting there!


And, last but not least, I am making progress on my grey dots fabric. I'm over the halfway point in the warp. I get 4-12" woven each day. I've added a weighted binder clip temple like this paper clip one due to the loss of four warp threads on the left side (I've only lost one on the right). I decided not to repair the broken warp threads since they are in the selvage...and I expect they would just break again if I repaired them. Inch by inch I'm moving along!

Tuesday, March 02, 2010

Plant stand, card weaving prep, and progress!

My husband came home the other night and needed a project--something that he could make in one night and complete. I had already drawn up a sketch for my plant grow-light stand, but together we got real numbers, and he went to town! Isn't it great! Eventually I will move it up onto a table on the porch. :)


I've been winding warps. There are 11 card weaving/tablet weaving warps in this shoe box. The girls are church are going to make friendship bracelets.

The warping method I used was one Linda Hendrickson uses--continuous warping. The pack of cards are threaded as one, and single cards are dropped as the warp is wound. Sound confusing? It's not as bad as it sounds. She has a video on youTube to help.


And, last but not least, I am making progress on my grey "dots" warp. Between my sore shoulder and a jammed little finger I am making slow progress...but it's still progress! I'm glad to be able to weave, and I love to pet the finished cloth as it's woven!

Thursday, February 18, 2010

The Journey Continues...


I am almost done warping my 1000+ thread cloth. The heddles are all threaded and the warp is beamed. The first knots are holding the warp to the front apron. It was about at this point that my tummy declared it to be lunch time, and my clock said that I had other work to get done before my house guest arrives!

I'm hoping to get the warping completed and the weaving in progress this evening!

Wednesday, February 17, 2010

Heat Set, Shibori Style Pleats

A few months ago I wove a scarf with 3/1 vs. 1/3 twill stripes as an experiment with collapse weave. It was moderately successful, but I wasn't thrilled by the results.

Since then, I've read Catharine Ellis' Woven Shibori and a couple of web posts (Yarn Bits, Aug. 2, 2009), and tried a new experiment with one of my samples.

This sample has a mystery yarn (probably a polyester blend) alternating with a 10/2 unmercerized cotton as the warp with another mystery yarn, most likely an acrylic, as weft.

I stitched gathering threads into the sample every 3/4" to 1" and tied them tightly.


Once stitched and gathered, I steamed the sample for 20 minutes.


The resulting pleats were amazing! Oh, wow! This is what I was hoping for!!! Really, the pleats are wonderfully elastic and I was thrilled with the way this worked!

Some things to note: the imperfections in the gathering remain in the set pleats...see the little blue "bubbles" near the bottom of the piece? See how the piece curves up near the fold between the pleated and un-pleated sections? I'll need to be careful to have the piece gathered smoothly.


One last experiment. I had to see how permanent these pleats were.

A twenty minute soak in lukewarm water did not change them.

The iron set for acrylic (lowest temperature setting on my iron) easily flattened the pleats when the sample was still damp (see section marked with two arrows).

The same low temperature setting also removed the pleats from the completely dry sample (see section with single arrow).

So, my exuberance at seeing pleats is tempered by the knowledge that these are quasi-permanent. They can be washed, but the need to be line dried. My guess is that running this through the drier would remove most of the pleating. I can't wait to try more!

Wednesday, February 10, 2010

Color with Perler Beads


I ironed this perler bead creation for my oldest daughter this morning and was amazed at her use of color.

In person it has an overall brown look, but the spots of color really jump out and shine!

When I grow up, can I create color combos on the loom like this?

Tuesday, February 09, 2010

Index Card Case


I'm taking a break from my 1008 thread journey. I'm still threading and my shoulder is complaining and sore.

In the meantime, my oldest daughter is starting her first research project. We purchased 3x5 index cards for her to take notes on, but didn't think that the typical hard plastic box would work for carrying the cards back and forth to school.

This little envelope-type pouch will hold over 100 cards and only took a little bit of research (on-line of course! There are lots of free tutorials available! :) and 30 minutes of sewing time.

The stretchy loop is from an almost dead hair rubberband and the bright yellow button belonged to my grandmother. The fabric is from the stash of quilting fabrics a friend passed along my way.

Saturday, February 06, 2010

A Journey of a Thousand Threads...

"A journey of a thousand miles begins with a single step." Lao-tzu

This warp has 1008 threads. It has become a journey and a challenge.

My plans started with the desire to weave yardage to make a skirt. It sounds straight forward enough, right? I did a sampler before Christmas and got an idea of what my sett should be, only to decide recently that I didn't like the idea of plain weave or twill for this fabric. I wanted something more interesting--something I couldn't buy in a store.

It took a lot of searching to find the right pattern. In the end, I chose a set of somewhat irregularly spaced dots that uses 7-shafts. I wove some tea towels as samples. The exciting part of the sampling was that the dots showed up even when the warp and weft were the same color yarn! Yea!

Now, I have 1008 ends threaded through the reed on my loom...3 per dent in a 10-dent reed. I've had problems in the past with three threads tangling, so I took some extra time and wound the warp with two threads at a time, but made a 1x1 cross (I even made a teeny tiny warping paddle to make this easier!). Then I threaded the reed in single thread layers. I am currently at the point of threading the heddles. It's not moving very fast, but I'm still working on it!

Here's to an interesting journey!
1008 threads through the reed


three layers of threads


tea-towel sampler

Pirate Patches

A couple of weeks ago it was my turn to teach preschool. The letter of the day was "P" and we went with a pirate theme. These cute eye patches are made from felt and some knitted "i-cord". They were a big hit!


Arrrgh, Matey!