Sunday, December 06, 2015

Christmas Quilts, part "finale"

I've been working on these quilts for some time now.  It was 2010 when I realized that my children were growing and we would someday no longer be able to fit all five of us on the couch comfortably and snuggle under the Christmas Quilt.  That's when I decided that each of my children needed their own quilt.  These are small--~60"x70"--but big enough to snuggle under while we read from our advent story book.  I took a year and made all the blocks, one pattern each month.  Then, one per year, I made the quilt tops and quilted them.  Yesterday I finished the last one.  
Each of the quilts is unique...the backings are different, the order of the blocks are different, even a few of the blocks were intentionally put together in different ways.  I love having each of the kids snuggled under their quilts.  I love how they carefully fold them when they are done and choose which pattern will show.  I am grateful for these peaceful moments!

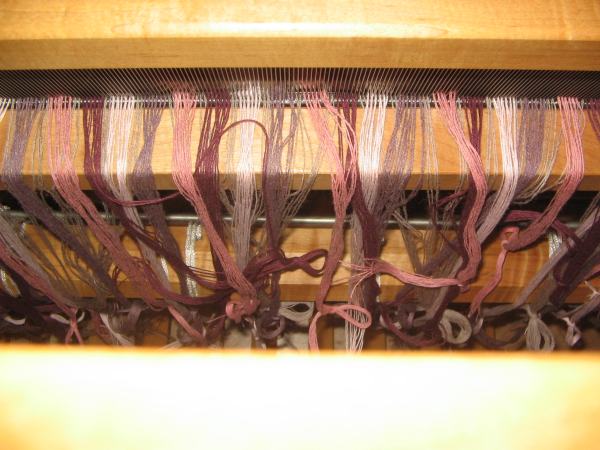
Here's a piece that I've just started to weave.  It's a wide piece--~34"--about as wide as I like to go on my 36" loom.  The plan is to weave differential double weave and have the cotton colors form bubbles as the wool (it's a tan--four threads between the cotton colors) shrinks.  We'll see if things go according to plan!

Thursday, September 10, 2015

Green Projects

This photo is green, but in reality this project has lots of colors....red, green, white.  It's my daughter's Christmas Quilt.  The odd pin-like-thing is a basting pin.  The top and back are done.  The two are pin-basted.  Now it's time to decide if I'm going to quilt with or without a frame.

This green project was a gift to my daughter.  She designed a doll recently and the poor doll had no clothes.  So, I used some quilting scraps (see project above) and made a pair of pants for the doll, then found a bit of t-shirt ribbing and made a shirt.  Viola!  Green outfit!

Sunday, August 30, 2015

Salsa!

Yesterday was a good day to harvest tomatoes and peppers from our garden.  I got over 5 lbs. of orange tomatoes!  These are roughly baseball sized fruits and taste wonderful!  I chopped everything up and made salsa.  The photo above shows everything except the 4 cups of onion in my pasta pot.  That was when I realized I needed a bigger pot and brought out one of my big applesauce pots!

Here it is already to cook (in the bigger pot!).  As I filled canning jars I was asked, "Have you tasted it?".  True to form, I hadn't!  We tasted some right then and declared it good! Whew! I do love the bright orange color that these tomatoes give to the salsa!

Friday, July 31, 2015

Lichen Dyeing

lichen


This is a summary of my first experiment with lichen dyes.  I scraped the lichen (a flat, blue-green lichen that is common on our maple trees here) off the wood with a knife, then let it soak in a 50:50 ammonia:water bath for 6 weeks.  I used a few tablespoons of the ammonia/lichen concentrate in ~2 cups of water to make a dye bath and inserted a mini-skein of border leicester wool yarn.


Dye on left, concentrate on right.  Dyed mini-skein on ball of un-dyed wool.


The result?  A very pale, unsatisfying yellow. The dyed mini-skein is on top of an un-dyed ball of the border leicester yarn in the picture.  The mini-skein did not take up much color.

Sunday, July 26, 2015

Dress Stand

This week I am getting ready to take new art to my local gallery.  I have to make sure that I get all my tags made and everything labeled right.  I also have to make sure I have all my display props ready.

I'm the only fiber artist currently at the gallery.  They do a really nice job of displaying wall art and sculptural pieces.  They aren't so good with the textiles.  

I decided that I needed a dress form to use to display my scarf.  Have you ever priced dress forms?  Ai-yi-yi!  They can be expensive!

Thankfully, we have an antique store in town.  The owner let me buy this beauty for just the right price...as a way to support the art gallery!  If you are looking for an antique store to visit, come to Crawfordsville and visit "La Rose on Main" (she's on Main street).
 And then, come visit Athens Arts (on Washington St.) and see how this lovely dress stand is being used.  The new art will be up on Aug.1st.

Sunday, May 17, 2015

Natural Dyes--Rhubarb Roots

I've been working with plant materials as dye stuff.  My main resource is "Wild Color" by Jenny Dean.  It includes an reference for dyeing with the roots from the rhubarb plant.  My rhubarb plants went to seed last year and I have a number of unexpected new plants in the yard.  So, I decided to remove one older plant and experiment with it as a dye source.

Of course, I harvested the rhubarb first, and got rid of the leaves.  Then I dug up the roots, washed the dirt off them, and cut them into small pieces.  The roots were a strange texture--very spongy!  

The dye was prepared two different ways.  #1.the tea method.  Pour boiling water on the roots and let them steep overnight.  Use the liquid as the dye stuff.  After dyeing, dip in an acidic solution (vinegar works great).  The resulting color--pale yellow.  #2. the boil method.  Place the roots in a pot with water and boil them for 30-60 minutes.  Remove the roots and add wool fibers to the pot.  Return to a simmer and cook for about an hour.  Dip the fibers in a basic solution (ammonia) after dyeing, and the color turns a pale pink.

For both of these, I used approximately equal weight of fresh dye stuff to prepared wool fibers (Falkland wool roving).

Rhubarb roots and dyed Falkland wool.

Sunday, April 26, 2015

Exploring Sunprints and Baskets

I haven't been doing too many big projects at home lately.  I've been working and, surprise!, am tired at the end of the day!  I did have some time off this week and tried my hand at some new things.

Baskets.  On the left is a "coiled basket" made from handspun yarn wrapped around a cotton core.  I must admit that I really tried to avoid making a coiled basket.  I didn't want to!  It was sure to be painfully slow!  Well, it wasn't terrible and I may even make another one of these days!  On the right is a woven basket.  Both warp and weft are handspun yarns.  This basket is just big enough to be used as a doll hat for a Barbie (my daughter tested it for me!).  It's a soft basket and flexible.  I'm not sure how well it would stand up if it were bigger.  I may try again on this type of basket too!


Here is a piece from one of my other experiments:
This was a piece of off-white muslin that was painted with a wash of acrylic paint and had paper snowflakes set on it.  The whole thing was placed in the sun to dry.  Apparently, as the cloth around the snowflakes (or other object like leaves or flowers) dries it wicks the paint and water from the covered areas, leaving a "sunprint".  I haven't decided how to use my printed fabric, but I think it looks cool!


Tuesday, April 07, 2015

Experiments--socks and egg biscuits--and a Wooden Quilt

Years ago I spun a variegated purple roving into a two ply yarn by splitting down the middle to make two similar yarns.  I thought that I was going to make mittens, and I tried once!  But the mittens were ripped out and the yarn has sat in my stash for a long time!  I decided to try some toe up socks with the yarn and I had just enough!


These were knit from Wendy D. Johnson's Toe-up Socks book, and if you look closely at my toes you can tell that I didn't follow the pattern very well!  I'm not a big fan of toe up socks.  I'm not sure why.  Maybe it's just because I don't have much experience with them.  At any rate, given how little yarn I had, I knew that toe-up was the way to go.  I'm pleased that they worked...I'm still not a fan of the technique.


Here's another experiment....eggs in a biscuit.  For those of you familiar with Scotch eggs (hard boiled eggs in sausage), this is the same idea, but with a biscuit around the egg.  The idea was from one of my co-workers....she was super excited to try this with soft boiled eggs.  I don't like runny yolks, so I used medium boiled eggs.  The end result...they were yummy, but not yummy enough to make them every day!  They were a lot of work!


And, lastly, a hearty congratulations to one of my associates at Athens Art Gallery.  Ben Wilson is a woodworker at the gallery and was commissioned to make this quilt from wood.  It is beautifully done!  If you are local, it is on display at the gallery for most of April.

Sunday, March 15, 2015

Coverlet repair, Sampling, and Transparency

I received a surprising phone call the other day.  A woman had seen my work at the Athens Arts Gallery and was looking for a weaver's opinion regarding some family heirlooms.  We set up a time for her to come over and this is one of the things she brought--a piece from a coverlet that her great-grandmother had woven!

Even more amazing to me than the beautiful weaving was the repair job.  Do you see the faded blue rectangle in the middle of the photo?  It is a patch that was sewn onto the coverlet. ~The weaving studio at Conner Prairie recently had a reproduction coverlet that needed repair and this type of repair is precisely what we were discussing.  So amazing to see it in person! 

I've been doing some sampling for a blanket.  The weave structure is M's and W's and is from Carol Strickler's Weaver's Book of 8-Shaft Patterns.  The cool thing about these samples is that by turning the tie-up, I was able to change where the floats appeared.  In the sample on the right, the floats are in the colorful stripes.  In the middle sample, the floats are in the cream stripes.  On the left, the floats alternate in a checker board pattern from colorful to cream and back.  Unfortunately, I think that the floats are too long and need to go back to the sample warp and try again.  (On the one hand, I'm disappointed.  On the other hand, I'm grateful that I'm learning this now, and not after I put on two blankets worth of warp!)
  
The pencil is under one of the floats.

And, lastly, here is a transparency sampler that I just finished.  The background warp and weft are 40/2 linen set at 30 epi.  The pattern weft is 8/2 cotton.  I used a cartoon under the warp to help me make the pattern shapes. --Check out all the snow visible through the window.  Spring has arrived since I took this photo and that is all gone and instead, I have crocuses blooming in my sunny front yard!  Hooray!  Hooray! Hooray!

Monday, February 09, 2015

Preparing a Vest...err Shawl...err Cocoon!

Remember this warp?

And these rolags?

It only took a week or two to spin and ply the yarn.  I plied on my Louet wheel, but the spinning was on my Majacrat Little Gem II.  

And here's the weft and warp together.  The warp was woven in less than a day.  I am amazed at the speed of weaving yarn this size!  (~14 wpi and sett at 8 epi).  Once off the loom, I sewed the edges with the sewing machine so they wouldn't unravel and then I fulled the fabric to make it more stable.

The goal now is to make this into a vest....I'll be busy tomorrow!

Tomorrow came and went, but the fabric never did make it to become a vest.  I ended up making a cocoon by sewing the narrow ends of the rectangle of fabric to the top long edge to make sleeves.
The seams are at the shoulders and top of the arms.


Here's the curve of the front.

This one is currently on display (and for sale) at Athens Arts Gallery in downtown Crawfordsville.  I must admit that I think it would be great if it sold... but if it doesn't sell, then it would be mine!  Deep sigh! It's such a challenge to put my work up for sale!


More Warp Twisting and a Finished Vest


Here's a photo of my warp from the last post.  Some of the raddle sections show twisting.  Some do not.  I don't know that I did anything different from one warp chain to the next.  If, or when, I figure this out, I'll let you know what I've discovered!


This is me in a newly finished vest.  I dyed and spun the wool for this piece, then wove it as a plain weave section  and a twill weave. I haven't been able to date spinning and weaving for this.  The twill section had it's ends woven in like I learned in Joan Sheridan-Hoover's finishing class at the Michigan Fiber Festival in 2007.  So I know this fabric was finished sometime after summer 2007...  But when did I spin and weave it?  I tried to sell it as yardage numerous times.  I often thought that the twill and plain weave would make a great vest, but it wasn't until I put the twill on the front (I kept trying to use it as a yoke) that I had enough yardage to proceed.

The inside of the vest is finished with hong kong seam finishings--bias tape over the edges of the fabric at the seams.  It looks neat and clean!  Now I just have to decide if it is really mine or if I'm going to put it in the gallery for sale.

Saturday, February 07, 2015

Raddle Woes--Twisting Warp Bundles

Calling all Back-to-Front warpers!  I need help!  I am winding my warp with a 1x1 threading cross at one end and a 12x12 raddle cross at the other.  When I have wound my warp onto the back beam (the raddle cross is now buried under all the layers of warp on the beam) and start to thread the heddles using my 1x1 threading cross, I get twists in the warp.  Why?

Check out this photo.  The warp was wound in small, separate chains--greens, pinks, browns.  Why are they twisted?  The entire warp chain for each color is not twisted, just the threads in each raddle space are twisted.  (Did that make sense?  If the entire warp chain were twisted, I would expect to see threads from one side of the warp chain crossed over both raddle spaces for that color.)

Anyone have any insights?
Thank you!

Friday, January 16, 2015

Rigid Foam Display Board

My textiles (mostly towels) have been displayed on a table at the art gallery.  A friend suggested that I find different ways to display them.  I took in some free standing towel rods that I used at the Farmers' Market, but I also made some display boards to hang like framed art.

First off, a big thank you to Sue Parker-Bassett from the Weaving Indiana weaver's guild.  In November she did a presentation on Leno Lace and had samples mounted on boards like these.  

These boards are made from 1/2" rigid foam insulation (~$12 for a 4'x8' panel at Home Depot).  The foam was cut to size with an exacto knife.  I fashioned duct tape hangers/tabs, then covered the front of the board with a layer of polyester batting and some black fabric.  The batting was glued and the black fabric was stapled.  A piece of wire was strung between two duct tape tabs for hanging.
Here's the backs (that's a stack of three boards).


Here's a front.

And, here are some test shots with towels pinned to the boards at the gallery:

I left the two small boards (18"x24") at the gallery, but brought the large one home.  I'll be taking it back to the gallery in Feb. for the new "hang".  The towels are pinned at the top, but not the bottom, to allow for guests to feel the textile.

Sunday, January 11, 2015

Color Wrap Challenges and Happier Things


 Sometimes I find myself struggling to make a project work.  The color wrap to the left is like that.  What I think I want, what I see, and what I understand just haven't pulled together right yet.

With projects like this, I have found that stepping away and letting the project rest is good.  So, while I'm resting I'll share some things that have brought a smile to my face recently.

Kumihimo braids.  These two braids were made by my youngest daughter.  Her instructor was her oldest sister.  The yarns are all thrums.  We spent a fun hour one snow day going through my thrums finding yarns for both girls to use.  Oh, and the "extra" loops on these bracelets are for my daughter's thumbs.  Don't ask me why, but that's how she likes to wear them--on her wrist and on her thumb!

While the girls have been braiding, I have been spinning cotton.  This is one of Robin Edmundson's dyed rovings spun and plied into a 2-ply yarn.  I may even have a project for this instead of just a spot in my handspun cotton box!  I love Robin's colors and fiber preparations.  This was wonderful to spin, and I love the bright, cheery greens especially since we are in the middle of cold and snow!

This next photo is a project in the development phase.  I blended some of the bright pink silk with two colors of alpaca and spindle spun it to see if I would like the yarn....I think they are lovely yarns and I would like to weave a shawl with these.  Maybe it would be mostly brown with three narrow white bands at one edge woven in an all-over crepe twill.  Maybe it will become something else!  I need to make final decisions as to how much silk to blend with the alpaca.  I'm leaning towards 20% by weight silk to alpaca.

Monday, January 05, 2015

Swimming in Color

My colorful warp is off the loom.  It was a wonderful vacation project!  I ended up with a long sampler (~20"), a table runner, and two very different scarves.  Weaving with color has been lots of fun!
The table runner and sampler were sett at 24epi.  The warp for the runner is a black slub cotton.

 The scarves were sett at 20 epi.  Here is the short one on my model.  The warp threads were used as wefts on this piece.


The other scarf used left over yarn from Mountain Meadow Wool.  I won a prize from them in the "Look, Ma, No Sleeves" contest that Handwoven ran a few years ago.  One of the yarns (there are two light brown wools being used as alternate picks for weft) has alpaca and the other has bison blended with wool.  I think that I may get this scarf, but I'm not sure yet!
 

Franken-Inkle Loom

I have a home made inkle loom that I have loved.  Sadly, it was too small.  I couldn't even weave a full yard of band on it!  So, we franken-ized it.  I found a piece of the original board, we cut apart the little loom, inserted the board, made some connection points, and viola!  Now I can weave over two yards of inkle bands!  Yay!

(And the loom looks much better now that I have sanded it....much less "franken")

PS.  After two hours in the shop with my husband as we planned and he milled the slots, etc, we decided that it would have been easier to just buy a new board and dowel and make a new loom.  On the positive side, this little baby works just fine!